Free Stereo Imaging Trick to Make Speakers Disappear
This is a free stereo imaging trick I want to share, I’ve spent years experimenting with new gear—buying, selling, and chasing upgrades. But no matter how advanced or expensive your system is, it’s easy to overlook the fundamentals. Today, I want to highlight something that applies to any setup, whether it’s your first hi-fi system, an old mini system from the 2000s, or the latest, feature-packed audiophile stack.
If you aren’t paying attention to your stereo imaging, you’re leaving massive performance on the table—completely free performance, I might add. In fact, you might even fall in love with your existing system all over again by taking the time to dial this in properly. The improvements can be dramatic.
What Is Free Stereo Imaging and Why Does It Matter?
Free stereophony imaging is the ability of your speakers to project sound in three-dimensional space—left, right, and center. When properly set up, your speakers should make sounds seem as though they are coming from distinct locations in front of you, not just from the speakers themselves.
While this may sound obvious, I’ll admit I made the mistake for years of placing my speakers roughly in an equilateral triangle, giving it no further thought. I had no idea how much more there was to unlock.
It turns out, speaker placement is far more intricate than “equal distance, sit in the middle.” Room shape, furniture placement, wall reflections, and asymmetry in your listening environment all impact your free stereo imaging, sometimes significantly.
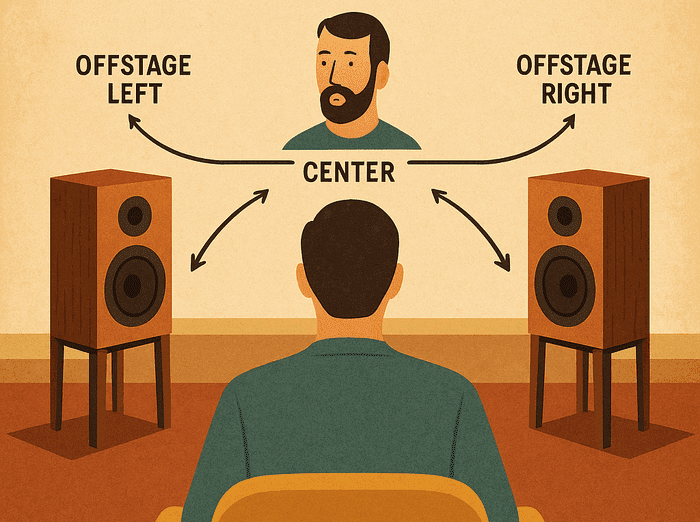
Why Most Stereo Test Videos Miss the Mark
You’ve probably come across basic left channel, right channel test videos on YouTube. While they’re useful for identifying swapped cables or phasing issues, they don’t really help you assess true free stereo imaging.
Luckily, I found a much better test—a recording where the narrator calls out positions like offstage, left of speaker, right of speaker, center, and midway. This kind of test gives you a real sense of space and placement, helping you visualize the soundstage your system is creating. Here it is..
I highly recommend looping a video like this while sitting in your listening position. Close your eyes and picture where the narrator is standing. If it doesn’t feel convincing, you’ve got work to do—and that’s where the fun starts.
How to Dial In Your Free Stereo Imaging Like a Pro
1. Start with the Basics
- Position your speakers equally spaced from your listening position.
- Start with a slight toe-in, angling them gently toward your seat.
- Make sure the tweeters are at ear level.
2. Use the Stereo Imaging Test
- Play the test video on repeat.
- Close your eyes and focus on each announced position.
- If the narrator’s voice doesn’t sound anchored dead centre or seems to drift, it’s time to make adjustments.
3. Make Micro Adjustments
- Move one speaker at a time—just a couple of centimetres or a few degrees of toe-in or toe-out.
- Test again after every adjustment.
- If you feel like you’re chasing the image, try adjusting the other speaker next.
4. Manage Room Influences
- Balance the distances of both speakers from side and rear walls.
- Watch for furniture, windows, or shelving that might reflect sound unevenly.
- Symmetry matters, but perfect symmetry is rarely possible—trust your ears.
5. Refine Toe-In for Width
- Once you have a solid centre image, experiment with the toe-in angle.
- More toe-in typically narrows the soundstage but sharpens imaging.
- Less toe-in can expand the perceived width, making offstage cues sound convincingly beyond the speakers.
Lock It In
Once you hit that sweet spot, mark your speaker positions with discreet tape or note their placement. Even small shifts—like bumping a speaker during cleaning—can throw your imaging off.
It’s worth re-checking your setup occasionally to recalibrate, especially if you move furniture or change listening positions.
Final Thoughts
Free stereo imaging costs nothing but time and attention, yet the benefits can rival expensive hardware upgrades. It’s the perfect Sunday project to breathe new life into your system.
For more setup articles, including speaker positioning and system tweaks, check out The Listening Room
Or, if you’re ready to put your system to the test with something new, check out my Vibe of The Week
articles to break free from the usual Spotify recommendations and find something fresh.
If you give this a go, I’d genuinely love to hear how it worked out for you. Feel free to drop me a comment or send me an email—always keen to hear about other people’s setups and what you’re hearing in your space.
One thought on “Unlock Proper Stereo Imaging: The Free Upgrade Your Hi-Fi Setup Needs”